Deploy to Cloudflare Workers
Deploy to Cloudflare Workers
部署到 Cloudflare Workers
Prerequisites
- A Cloudflare account
- A GitHub account (for connecting the repository)
- Node.js 18+ and pnpm (only required for local / Wrangler deploy)
Deploy methods
You have two options to deploy to Cloudflare Workers:
- One-click deploy — click the Deploy to Cloudflare Workers button above.
- Manual create via GitHub — follow the steps below.
Step 1: Create an application & connect GitHub
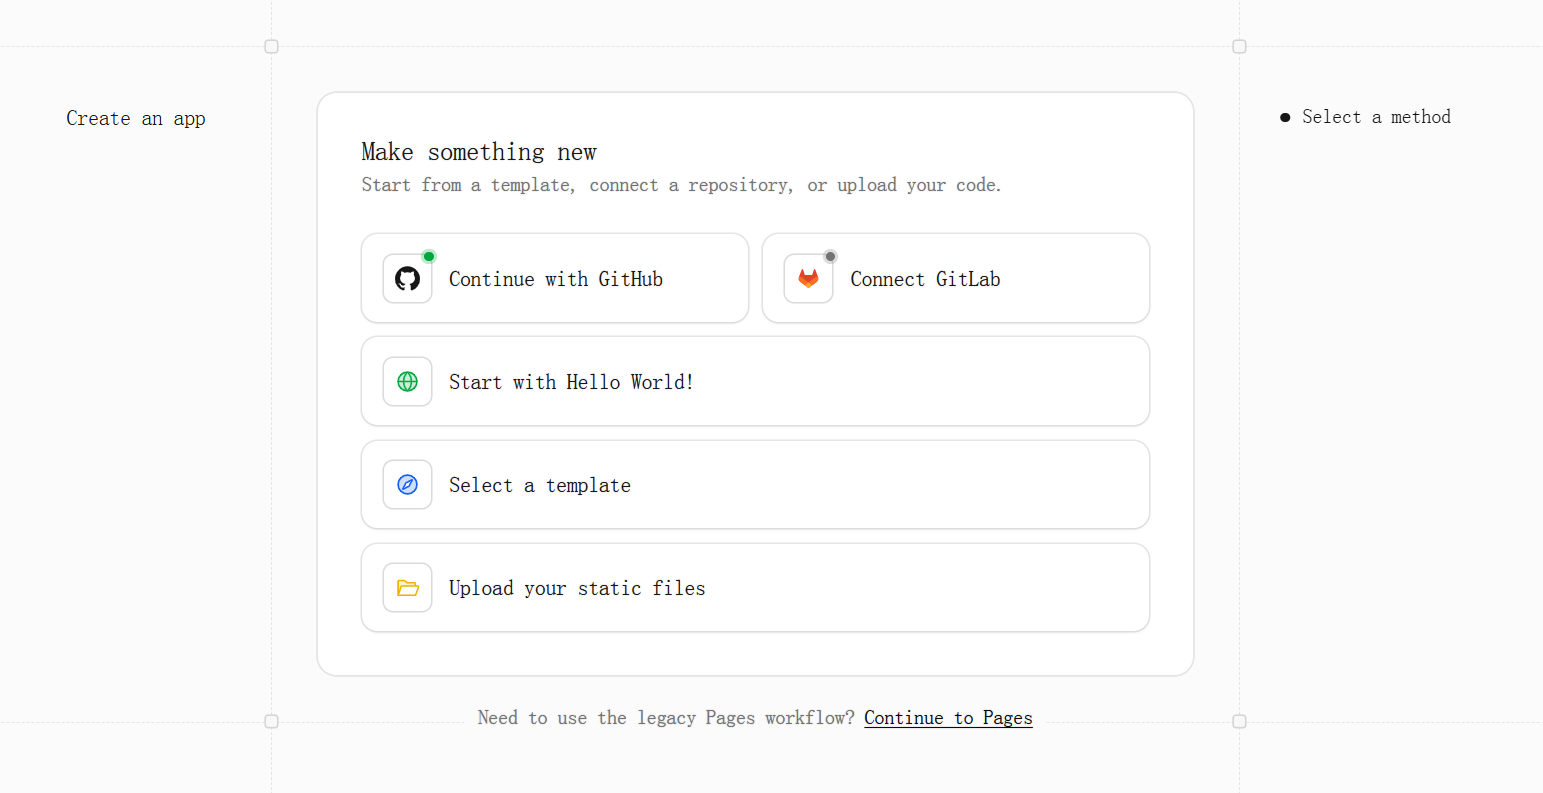
Open the Cloudflare Workers dashboard, click Create application in the top-right, and choose Connect to GitHub. Cloudflare will prompt you to authorize access to your GitHub account — click Authorize and select the account (or organization) that contains your fork.
Step 2: Select the repository
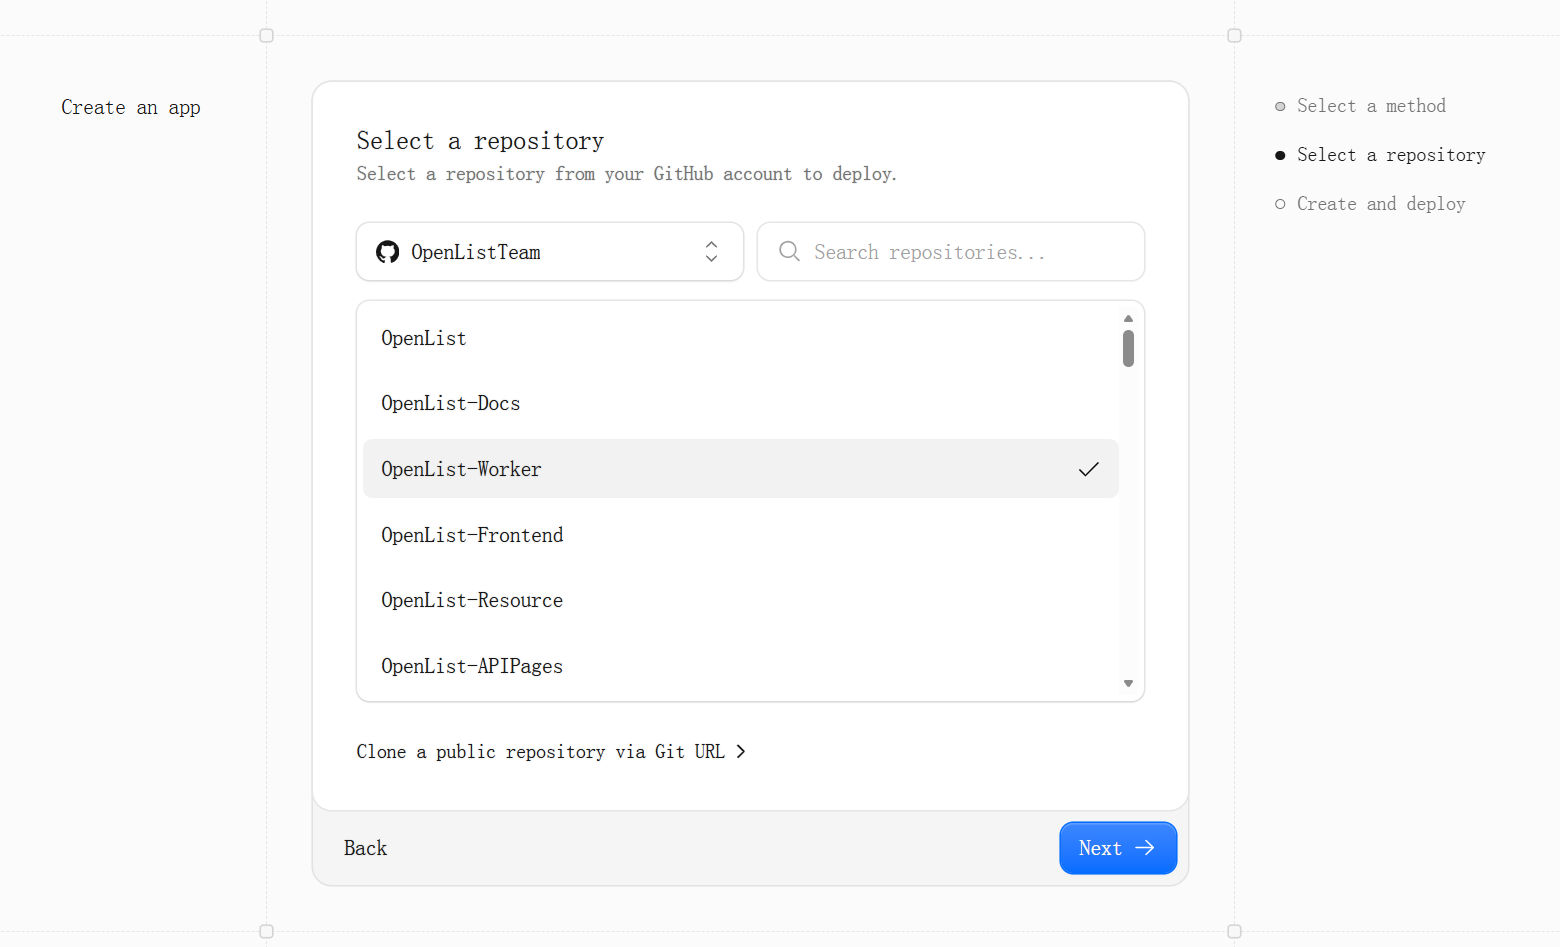
Fork this project to your own GitHub account first, then select your forked Worker repository when creating the application.
TIP
If you deploy directly using the upstream OpenListTeam/OpenList-Worker repository and Cloudflare reports "unable to fetch repository content", fork the project first and select your fork instead.
Step 3: Create the application
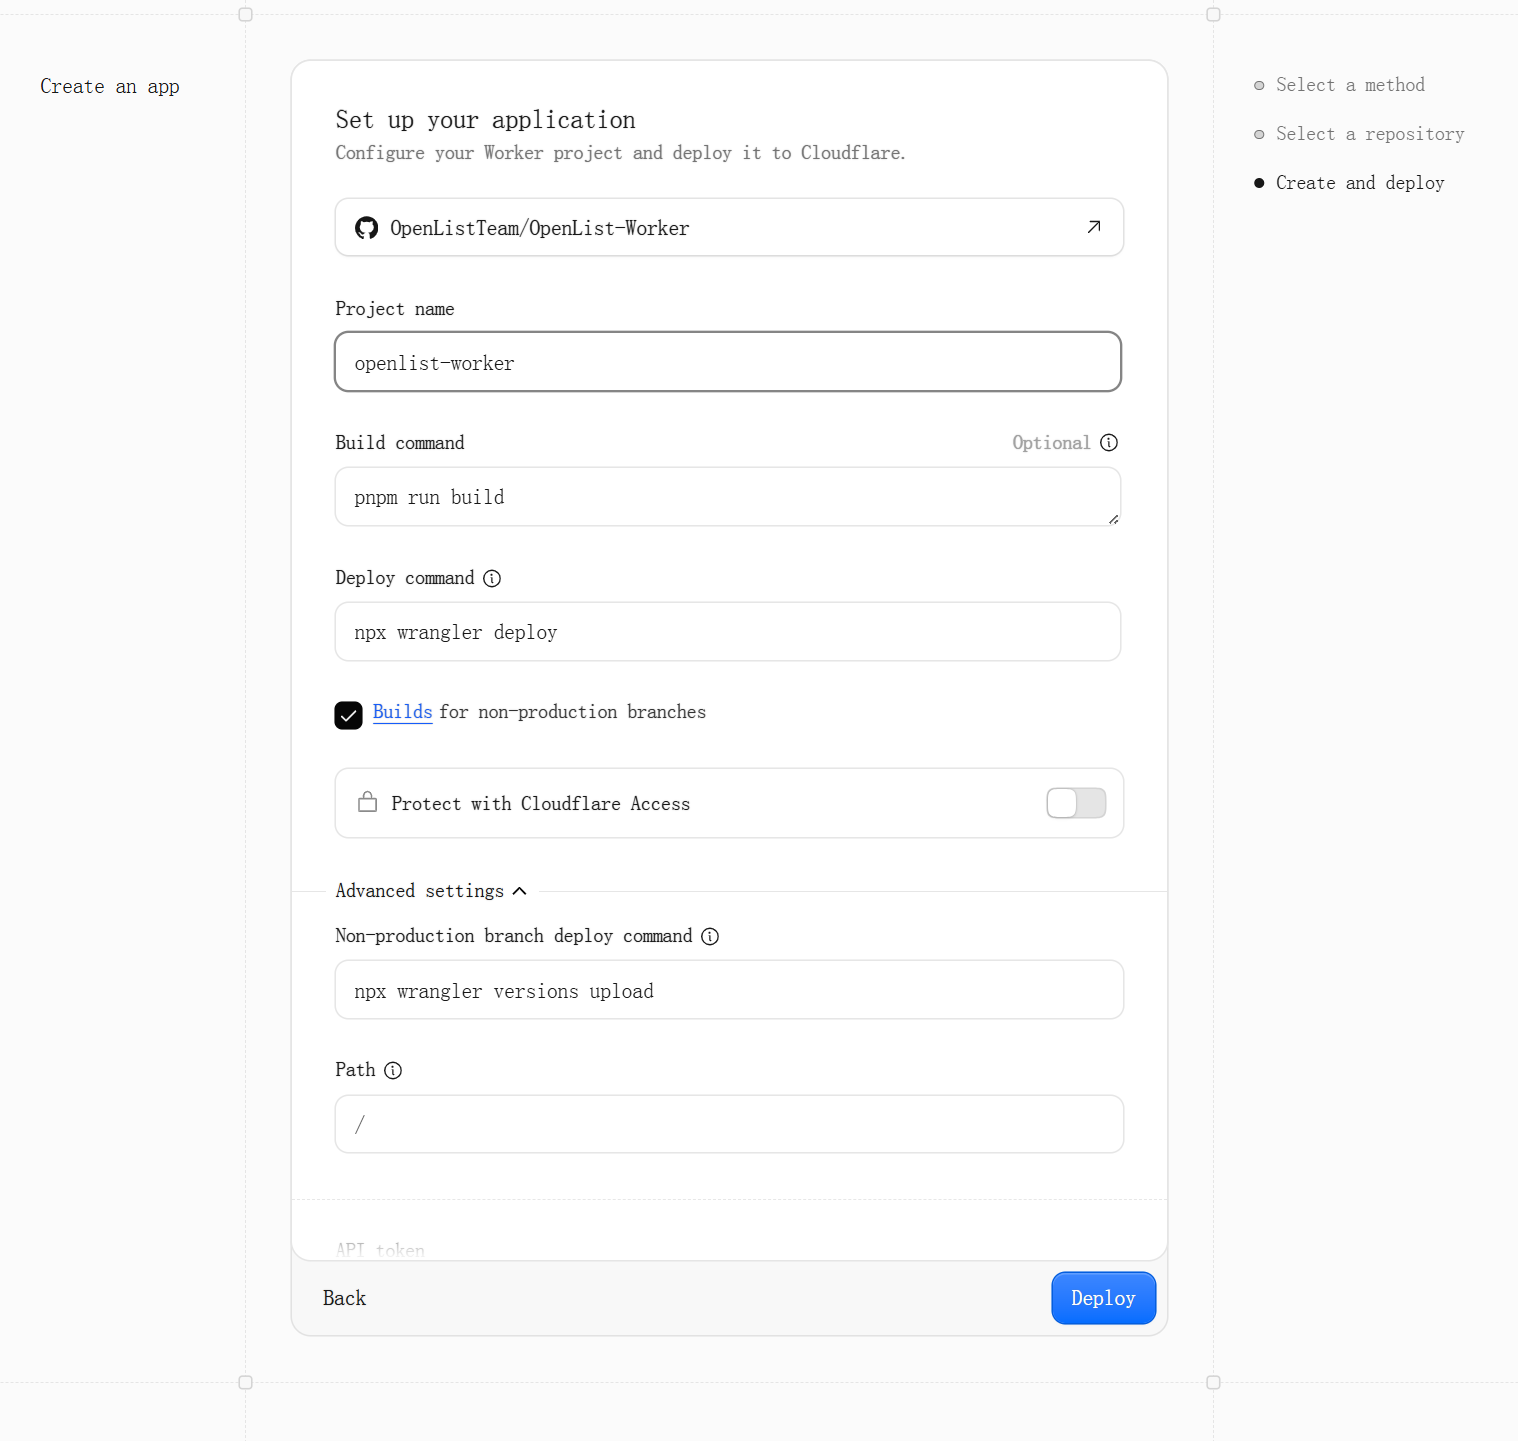
Click Create. Keep the default build parameters and commands:
- Framework preset: None / Workers
- Build command:
pnpm run build - Deploy command:
npx wrangler deploy - Production branch:
main
Cloudflare will build the Worker and deploy it to a *.workers.dev subdomain.
Step 4: Configure environment variables
Enter the Worker project you just created, open Settings → Variables and secrets (or Runtime variables and secrets), and add the environment variables.
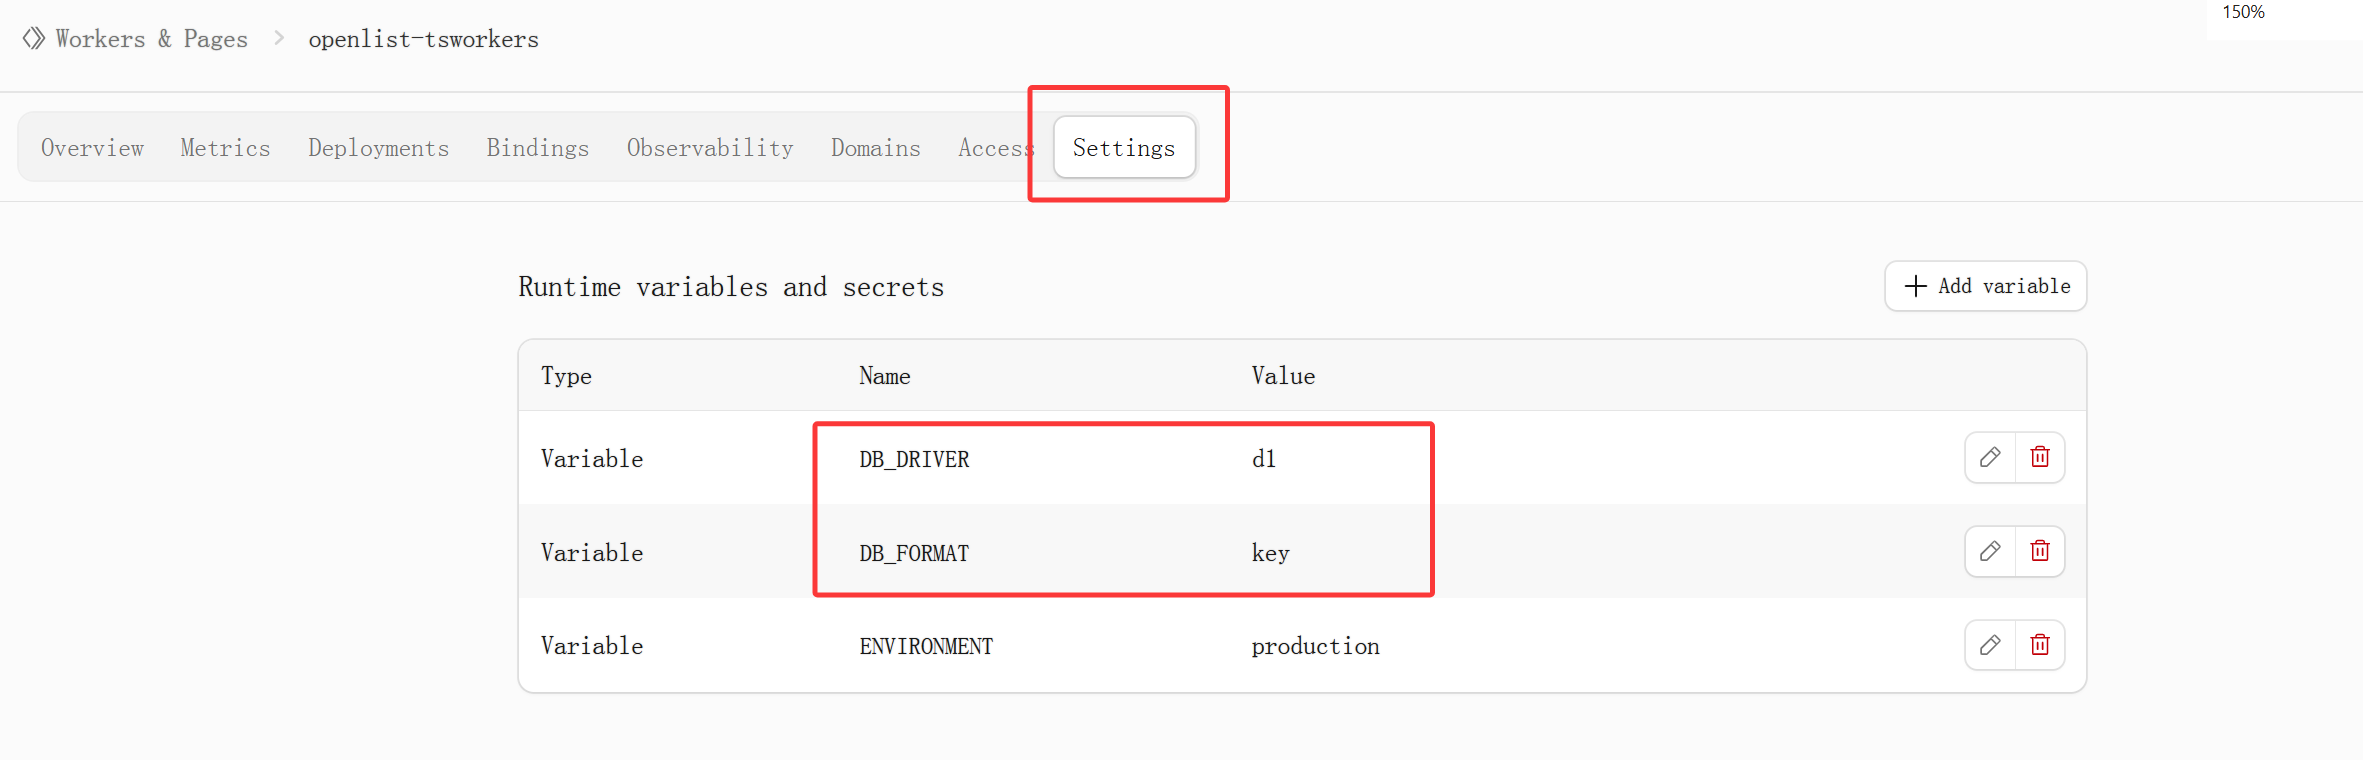
The required variables (DB_FORMAT, DB_DRIVER) and their optional combinations are described in the Environment Variables section at the end of this page.
Step 5: Bind the storage binding
If you selected KV or D1 as the driver, you need to bind the corresponding binding in Settings → Bindings:
| Type | Variable name |
|---|---|
d1 | DB |
kv | KV |
do | DO |
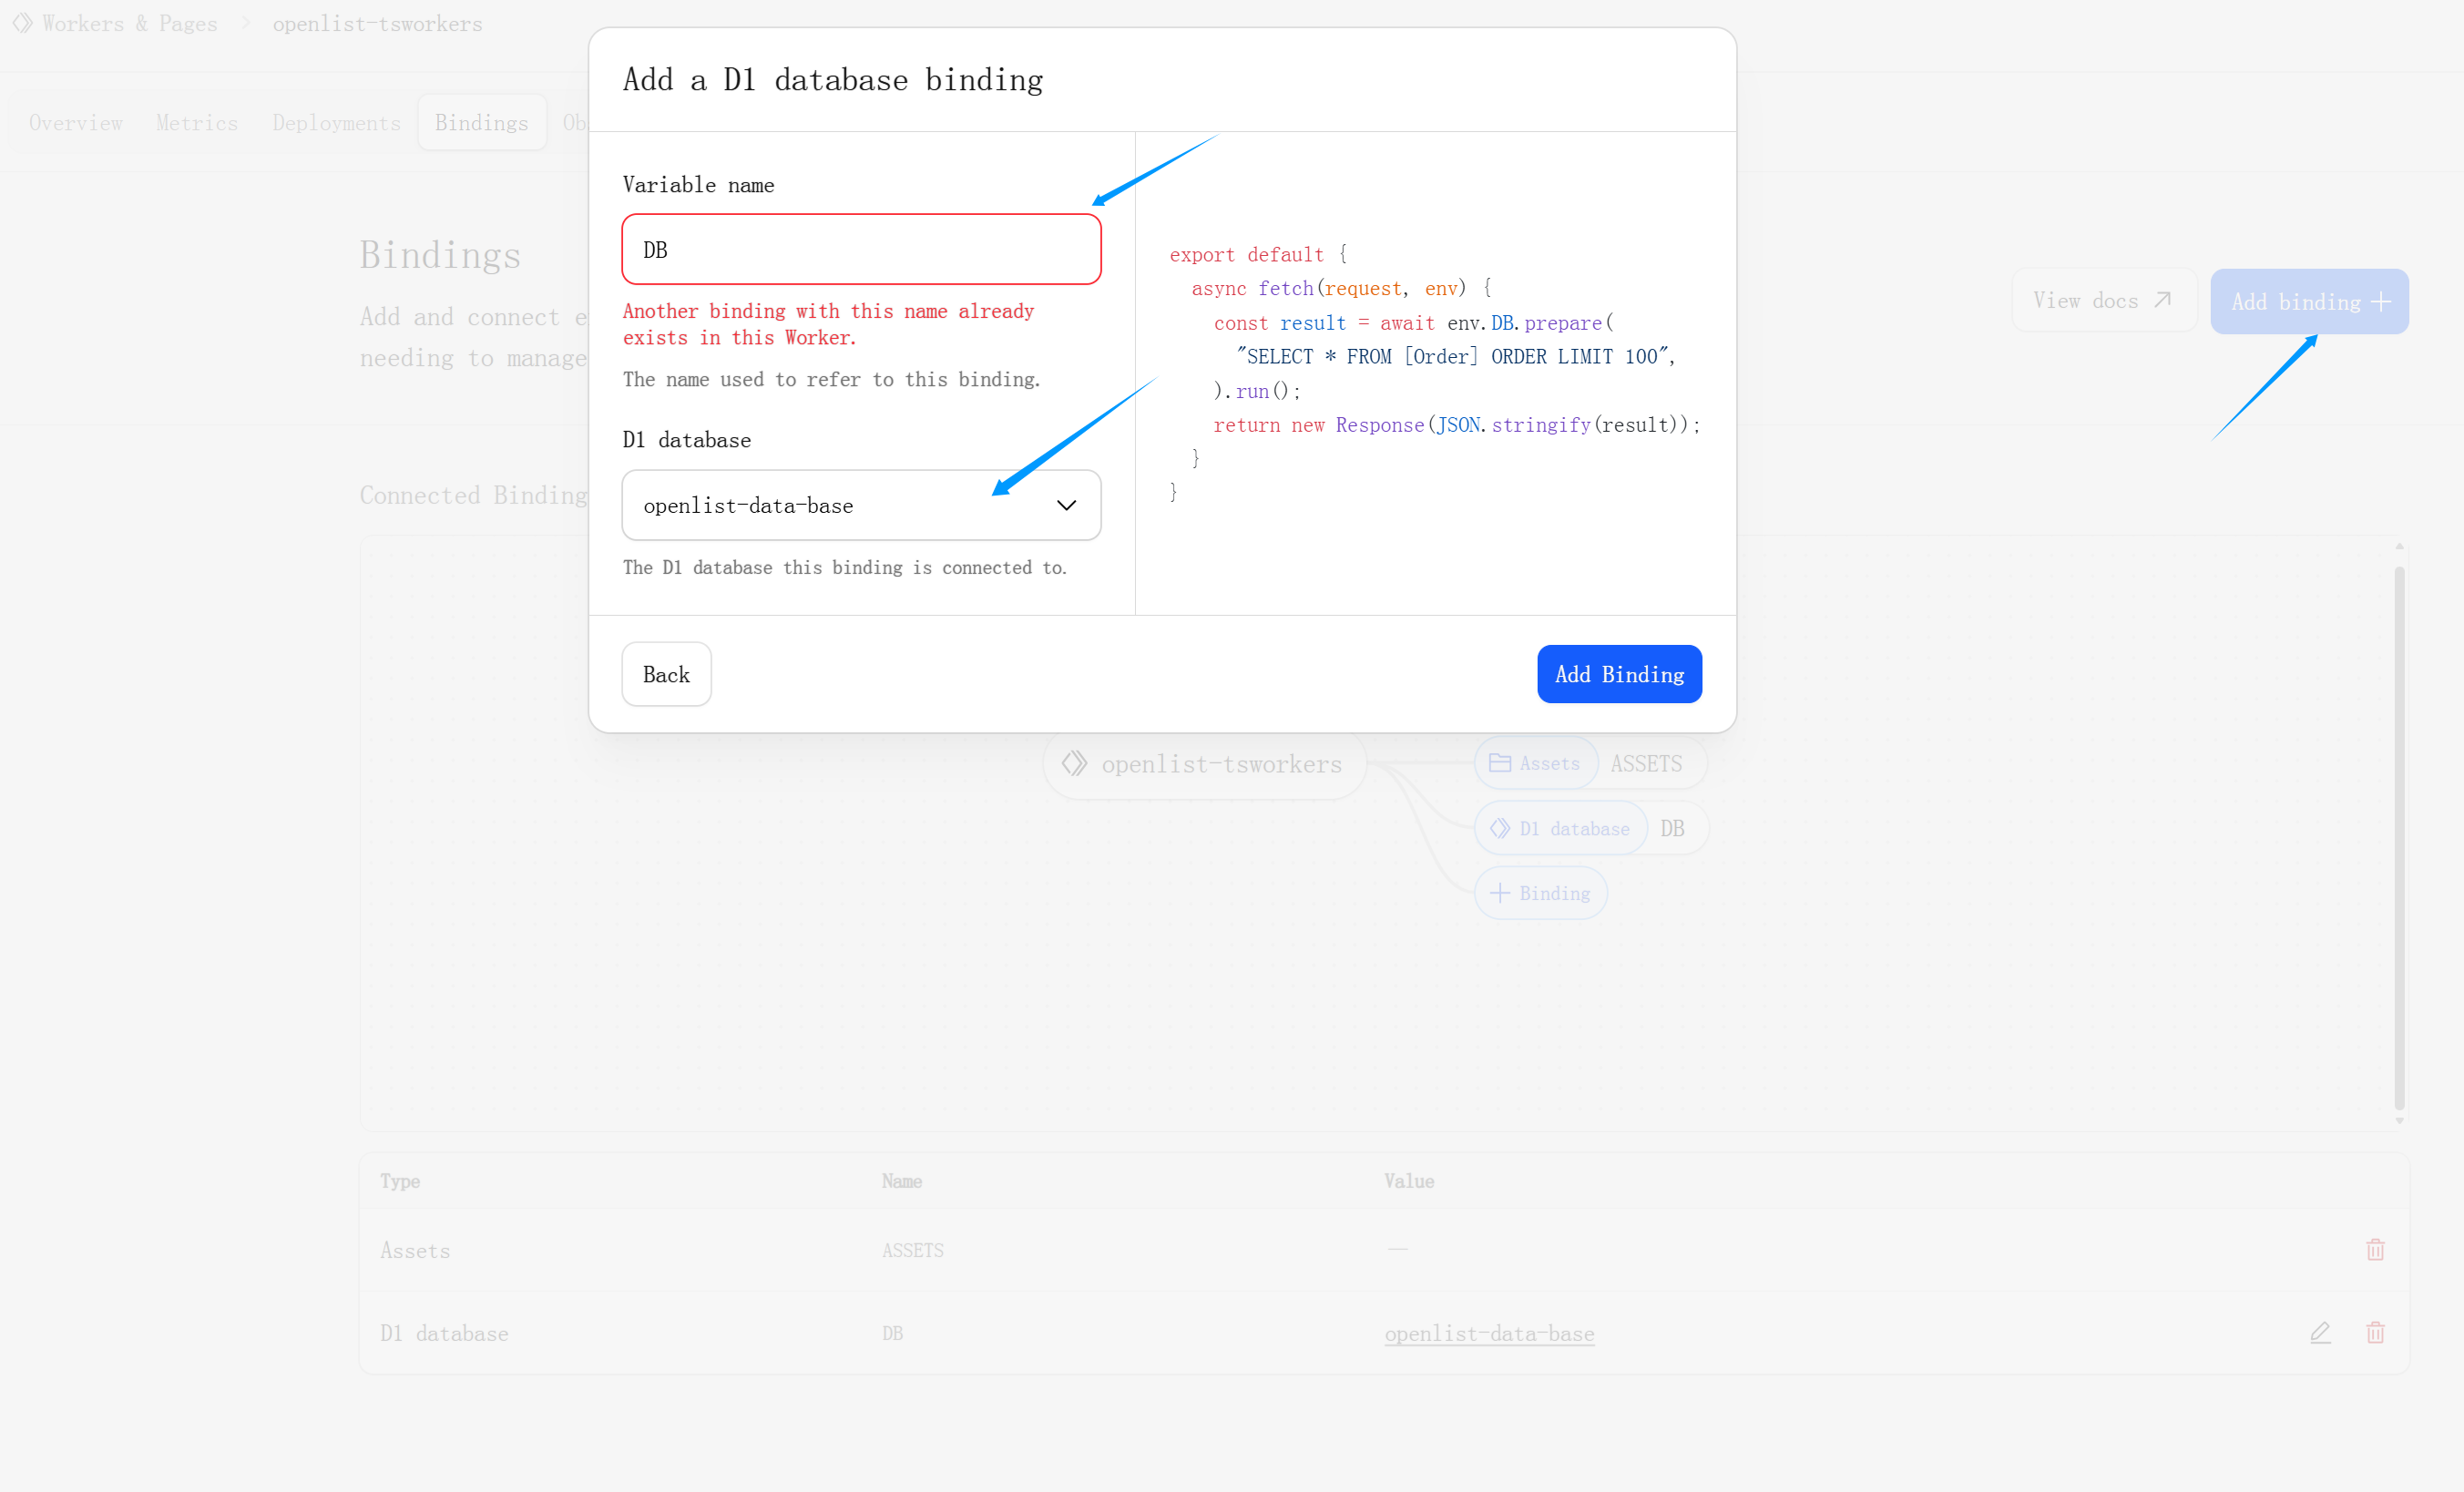
Automatic D1 provisioning
For D1, you can enable Cloudflare’s Automatic resource provisioning: omit database_id in the D1 binding, and Wrangler (>= 4.45.0) auto-creates a D1 database with the same name and writes back the ID on deploy.
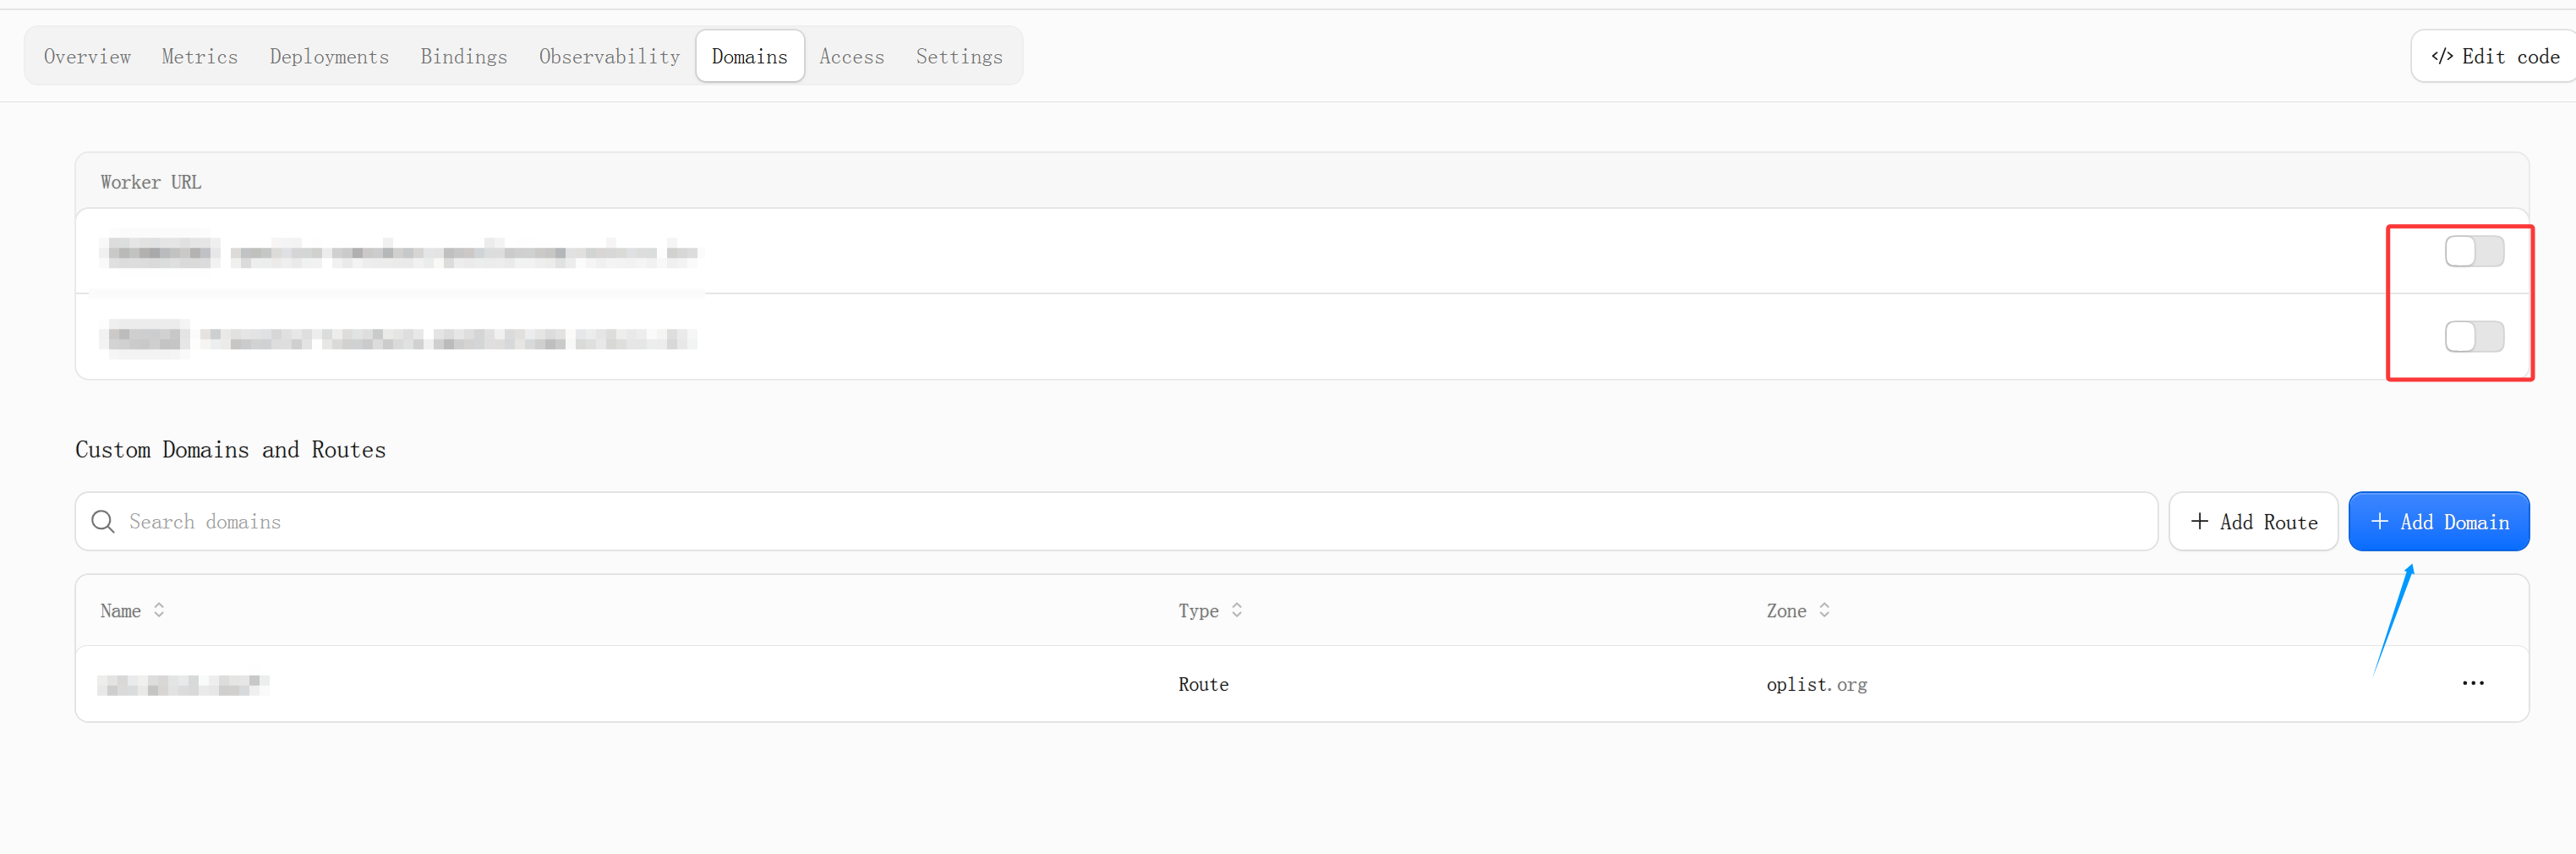
Step 6: Bind a custom domain
Add your own domain in Settings → Domains and Routes, then create a CNAME record for the subdomain pointing to your *.workers.dev domain.
After deployment
TIP
After deployment, the first visit to the site automatically enters an install wizard. Set the admin account and password in the browser to complete initialization — no pre-configured ADMIN_PASS is required.
Local / Wrangler deploy (alternative)
If you prefer deploying via the command line:
# 1. Clone and install dependencies
git clone https://github.com/OpenListTeam/OpenList-Worker.git
cd OpenList-Worker
pnpm install

# 2. Configure wrangler.toml (JWT_SECRET, KV / D1 bindings)

# 3. Deploy to Cloudflare Workers
pnpm run deploy
# or: pnpm run deploy:worker (skip frontend build)
前置要求
- 一个 Cloudflare 账号
- 一个 GitHub 账号(用于连接仓库)
- Node.js 18+ 与 pnpm(仅本地 / Wrangler 部署需要)
部署方式
部署到 Cloudflare Workers 有两种方式:
- 一键部署 — 点击上方的 Deploy to Cloudflare Workers 按钮。
- 通过 GitHub 手动创建 — 按照下方步骤操作。
步骤 1:创建应用并连接 GitHub
进入 Cloudflare Worker 管理页面,点击右上角「创建应用」,选择「连接到 GitHub」。Cloudflare 会提示你授权访问 GitHub 账号——点击 Authorize 并选择包含你 Fork 仓库的账号(或组织)。
步骤 2:选择仓库
请先将本项目 Fork 到您自己的 GitHub 账号内,然后在创建时选择 Fork 后的 Worker 仓库。
TIP
如果你直接使用上游 OpenListTeam/OpenList-Worker 仓库部署,且 Cloudflare 提示「无法获取存储库内容」,请先 Fork 本项目,再选择你的 Fork 仓库。
步骤 3:创建应用
点击创建,构建参数和命令保持默认即可:
- Framework preset:None / Workers
- Build command:
pnpm run build - Deploy command:
npx wrangler deploy - Production branch:
main
Cloudflare 会构建 Worker 并部署到 *.workers.dev 子域名。
步骤 4:配置环境变量
进入刚刚创建的 Worker 项目,打开 设置 → 变量和机密(或 运行时变量和机密),添加环境变量。
必选变量(DB_FORMAT、DB_DRIVER)及其可选组合说明,见本页末尾的 配置变量 章节。
步骤 5:绑定存储绑定
如果您在上一步选择了 KV 或 D1 作为数据驱动,则需要在 设置 → 绑定 中绑定对应的绑定:
| 类型 | 变量名 |
|---|---|
d1 | DB |
kv | KV |
do | DO |
D1 自动创建
对于 D1,可启用 Cloudflare 的 Automatic resource provisioning:在 D1 绑定中省略 database_id,Wrangler(>= 4.45.0)会自动创建同名 D1 库并回写 ID。
步骤 6:绑定自定义域名
在 设置 → 域名和路由 中添加您自己的域名,然后在 DNS 服务商为对应子域名创建 CNAME 记录,指向 *.workers.dev 域名。
部署后初始化
TIP
部署完成后,首次访问站点会自动进入安装向导,在浏览器中设置管理员账号与密码即可完成初始化,无需预先配置 ADMIN_PASS。
本地 / Wrangler 部署(可选)
如果你更习惯通过命令行部署:
# 1. 克隆并安装依赖
git clone https://github.com/OpenListTeam/OpenList-Worker.git
cd OpenList-Worker
pnpm install

# 2. 配置 wrangler.toml(填写 JWT_SECRET、KV / D1 绑定)

# 3. 部署到 Cloudflare Workers
pnpm run deploy
# 或:pnpm run deploy:worker(跳过前端构建)
For a full list of environment variables and recommended configurations, see Environment Variables.
完整的环境变量说明与推荐配置组合,请参阅 配置变量。